Sunday, July 31, 2011

Shrine Contest Entry:) for Retro Cafe Art:)


Hello Everyone:)
Well, in my last post just last Thursday,
I had stated that I was attempting to get
some quality art time in my art room this weekend.
I'm pleased to report, that here it is
Sunday morning, and I can honestly
say I've worked hard 
in the art room since Friday night:) 
Matter of fact....I haven't been to sleep
since Saturday morning!
Yes, I've pulled a 24 hour art
marathon!
(Husband and dogs quite happy watching any movies they want, eating tons of treats, and dozing whenever! What a great trade off for some quality art time!)
(I'm sick of coffee at the moment, grin).
But for all the effort, to finish up my
latest project, I'm quite pleased to show
you my entry for 
Retro Cafe Art's Shrine Contest that
Kristin Hubick is hosting!
Yes, the Contest Diva is having another
wonderful opportunity for all of us
to enter into another fun contest!
Go to Retro Cafe Art's Blog Gallery
(Link in my Favourites List:)
and there's still time for you to enter!!!
This is one of Kristin's big Shrine Kits
by Coffee Break Design
called 'La Guardarropa Shrine'
and you can purchase your own kit at
Retro Cafe Art:)
I painted the masonite kit, once I put it all together with 
Claudine Hellmuth's ,Studio Paint, Charcoal Black.
Then I took plain computer paper, used my favourite 
selection on script stamps, and used Distress Inks
 for the base paper covering the shrine. I again
used the same coloured Distress Inks, on computer
paper I had run through my Tim Holtz Vagabond, with
a 5 x 7 Cuttlebug Embossing folder, to create the paper
for the door panels.
The 'knobs' are Tim Holtz 'Hitches' that I like to
use as feet for these kits, but this time I also used
them for the door knobs. I used Glossy Accents
to set them into paper lined mini shrine pieces,
(also from Retro Cafe Art:).
Embellished the top of the shrine with 
a vintage watch face, and the word 'wish'
with Red Lead Alphabet beads:)

Then on the inside...
I took more of the embellished paper and made
bottle caps using the paper lining, to spell out
my 'wish':)
Further embellishment from Retro Cafe Art,
Masonite gears, (LOVE these!)
A small birds nest with a pearl, 
(suppose to be for wisdom, LOL),
and more of Kristin's new brass charms!
I love these charms, the great Brass Frame and Bee
from Kristin:)
(Vintage watch face with Tim Holtz 'Game Spinner'
and Red Lead's Beads:)

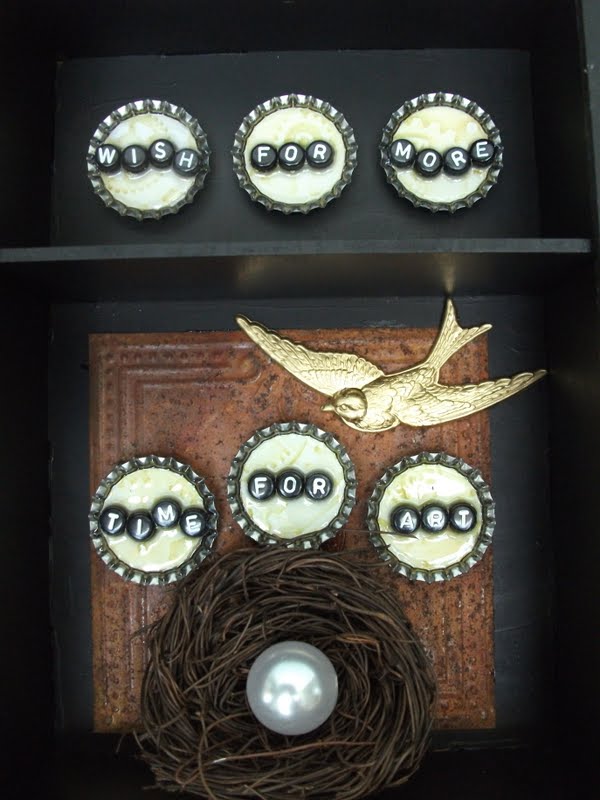
Also the cool Rusted Tile and the 
Brass Bird from Kristin:)

Then the back of the shrine...

I had so much fun making up these little
brass frames, that I decided I'd sign my
piece a bit differently this time:)

So now that I've finished my project and
posted it on my blog for all of you to see
something new....I'm off 
to enjoy some 'Husband and dog time'
for what is left of the weekend:)
Maybe even get a little nap in, and
watch some movies, and eat some treats:)
If 'they' left me any:)

Enjoy!


Thursday, July 28, 2011

Old and New:)


Hello Everyone:)
So this week I'm posting a little earlier than Friday as I have great hopes of being in my art room all weekend:)
In this household with all the pets, you never know if there will be time to grab for some art time, so I find if I announce that I'm scheduling time, usual the husband will take note and deal with the 'motley crew' and other creatures in our zoo:)

First off, it's become apparent to me, that all over
the Internet, Halloween projects are popping up.
I've even seen Christmas projects already being
posted, now usually I wouldn't get on the 'early train', 
but from an earlier post of mine, I've had this little
pile of goodies sitting on my art desk.
I tend to 'pile' things on my desk, in an effort
to get 'inspired' by usually a group of things
that don't quite make sense to me. It isn't until
I add something, or find something that triggers
an idea, that it begins to make sense. All I knew a few
weeks ago, is 'Halloween' when I saw this little group...
So, I purchased this little cardboard ornament from
Chris and Sharon at Red Lead a while back.
(Link to their wonderful shop in my Favourite's List).
I painted the ornament with Claudine Hellmuth's 
Studio Paint, Charcoal Black.
Using one of my favourite tools in my art room,
Glossy Accents by Inkssentials,
I glued the ribbon all around the outside edge of
the ornament.
I then took a plain mini paper doily, and used
Tim Holtz 'Distress Ink' Wild Honey and Walnut Stain
to cover the entire doily.
I used a paintbrush to cover a thin coat
of the Glossy Accents over the face of the
cardboard ornament, and placed the doily
on the painted ornament. Used a quick 
brush with my brayer to make sure that
it was sealed. After it was dry....
I chose one of my very favourite 
Vintage Photographs from my collection
You'll see these two girls from time to time,
as they're from my own collection, and they
print up on the printer really well:)
(A small project like this I wouldn't want to
use the original photograph. I'd only do that 
for a very special project piece).
I took a moon graphic and the 'girls' photograph
and printed them up, cut them out and placed them
on the doily along with picking out some head gear 
for them to wear:)
And of course, Fashion being what it is,
they also had to have other embellishments...
these are Kristin Hubick's new line of 
embellishment made by Coffee Break Design and
these were purchased from
Retro Cafe Art:)
(Kristin Hubick's Link in my Favourites List:)
(They're so fun to play with!)
I added a bit of Distress 'Stickles' to the glasses
'Picket Fence'
(Love the horn rim pair!)
And a couple of the pop out stars from the glasses.
(Even the salvage bits  can be used from these cut-outs!)
Next up...a greeting....
I LOVE THESE BEADS!!
Every time I place an order with Chris and Sharon
at Red Lead, I always try to remember to purchase
an extra couple of bags of these beads. If I could
afford it, I'd buy a case of them, as I love how
they make a statement in the black and white:)

So there you go, I'm officially taking the 
'Early Train'
on Halloween:)
I'll wait awhile before posting any more Halloween projects,
but then, Halloween is my absolute favourite of Holidays,
so don't hold me to that! :)

So that was the 'New' in this weeks blog post, and here's a bit of 
'Old' as I want to add more eye-candy for your enjoyment:)

It's been long enough now, that I feel I can post this past project that I did a few months ago.
We had a wonderful pet parrot named 'Connie' a few months
ago, pass away without warning. She's was a very special
pet of mine, as she was a gift to me soon after the loss of my mum.
We have had dozens of different species of parrots and other birds come through our home over the years. At one time we actually had 18 birds, 9 different species living with us.
Anyway Connie, was a Black-Capped Conure
And we referred to her as the 'Kitchen Conure'
as she was the only one that was allowed to live
in my kitchen, as she became a constant source 
of entertainment to me as she grew, and her vocabulary
was really out of this world!
(Most of our birds are rescue birds, and usually are difficult to be handled, but Connie was only 12 weeks old when she arrived, totally pliable and willing to learn).
I owed this little creature something really special
as she certainly was a main reason for dealing with
the grief of losing my mum.
So Connie the Kitchen Conure inspired this...
14x20 Mixed Media Canvas.
Caption says: 'Everyone who meets her,
marvels about her vocabulary.
What they don't hear or see,
is what she has taught me.'

I didn't know it at the time, that it would be just
a few months later that I would lose Connie as well.
Now, I'm so glad that she inspired me to give the canvas
a try, as it reminds me everyday of her, as I still
expect every morning when I go into my kitchen
to hear, 'wanna peanut!'
(Ok, so she was a little demanding once she figured
out the meaning of the words, but that's because she
was so brilliant!)
Anyway, now there's another parrot in the kitchen, our
dear old, (20+ year old), Chico who is a Maroon-bellied Conure,
and has her own vocabulary:) I figured it was time for
Chico to have a 'retirement' from the flock, and get real
one on one time. Now I hear, 'Kiss the beak' every morning, (grin).
And just so you know, the rest of the flock 
are actually in our living room:) 
We gave it over to the birds years ago, 
as we're suckers for a needy creature:)

So hope you've enjoyed the blog posting for this coming week.
It's a particularly long one, but hope you find it of interest:)
Have a great weekend!

Enjoy!


Saturday, July 23, 2011

Saturday Night Quickie:)

Hello Everyone:)
I hadn't expected to do a blog posting
this weekend, but I've had a great
Saturday afternoon in the art room
and decided to take a break and
show you the latest:)

It's another ATC Holder from
Retro Cafe Art
that I've put together since I still had
all the wonderful bits and pieces out
from the last one that I made.
And of course....bird related:)
As you remember the previous one that I made
that all the entries in Kristin's Contest won!
I've had a slew of wonderful comments
on these already, and even a offer of a
commissioned piece for holding business cards!
I'm really pleased, and have great fun making these:)

And a quick Shout Out for
 Kristin Hubick
at Retro Cafe Art Gallery as
she's gone 'Bonkers' with
I believe 3 Contests going all at once!
Please check out her Gallery Page
(Link is in my Favourites List:)
for all the information!
Also, while you're there,
please check out her 
New Design Team
Jennifer
Gerri  and Bianca's
Wonderful examples of their
Altered Art!
What Talent!

Enjoy!


Friday, July 22, 2011

Quick Post this Week:)


Hello Everyone:)
Just a quick post this week, as I'm up to
my ears in projects, for some fun posts
to come.
As you can see from the picture above,
my husband suffers with no meals
being cooked these days:) 
(Thank goodness for take-out!)
(Although those who know me, know that
this is a farce my having a new stove, as
I haven't cooked for so long, I rebelled
a while back, and so far it's worked!)
My brand new glass top stove seems to
be an extension of my art room, as I 
was busy last night tea staining tags,
and having my half finished canvas
placed to dry undisturbed....
He knew I was an artist when he married me!
(LOL)

Anyway,  what I can report of new projects,
is this canvas in process, as I've been continuing 
to play with my printer and tissue paper.
Unfortunately, the other half of this canvas
turned into a blooper, but my art pal Leslie always
says that there's no mistakes in art, just lessons,
so I'm currently figuring out how to 'embellish'
the other side of the canvas, which you will
see in a future post.....wart's and all! (grin).
The process of printing on tissue paper you
can find in an earlier post on my blog, and
I encourage all of you to cross your fingers
with your printers and try this medium as
I've found it to be quite a bit of fun!
Here's another hint of a project, and as you
can see from the colours, I'm thinking 
Fall and Halloween.....but since it's only
July, this will be a post later on, but I do
love the colours already! 
Must be our weather!
Ok, so this is to show you, that it's good
to recycle!
All of these containers I wash out after use 
and save and 'repurpose' as storage for my
art supplies. They are furnished by a group
of individuals that seem to go through
tons of these containers hence why I 
decided to find uses for them instead
of disposing of them.
This group I refer to are a motley crew who
take up a huge part of my art room, (and
are quite a distraction at times:)

First I would like to introduce you to 
Oliver Howard
our soon to be 10 year old Spitz.

Then there is Our Dear
'Mr. Ted'
a.k.a. Mr. Teddy, or just plain Ted:)
Mr. Ted is 15 years old and wonderful!
And this is our poor 'Moth Eaten' elderly poodle
Sidney Matisse Laptop
(yes, he's actually registered with that name:)
And, yes he is a purebred poodle....LOL.
Poor baby has had a rotten year of medical issues,
after a lifetime, (15 years) of good health.
He's the toughest one of the bunch and has
amazed us with what he has gone through
this past year, and pulled through...he just
looks like he's been attacked by moths!

So there you go, you've met my 
'Motley Crew'
who reside with my husband and I, along
with currently 9 domesticated and wild
birds in our home.
I won't make you suffer through meeting
all of them!
(grin).

Enjoy!


Monday, July 18, 2011

'Flounder Brain' Week :) :) :)


Hello Everyone:)


As you can see from my last post,
 (seems like forever since!)
I'm having what I am going to refer to as
'Flounder Brain' Week:)
I should elaborate...
Do not confuse the reference that I use occasionally
'Hamster Brain' with 'Flounder Brain'.
'Hamster Brain' is when you have dozens of ideas
for projects running around in your head, like a 
hamster in a wheel, but you're unable to 
pick one during this episode, so you become
overwhelmed with choices.
(Personally, I think it's a very creative state
of mind, and I don't mind those moments:)
Then there is 'Flounder Brain'!
I describe these moments, and in this case it's
been a week of them, as being like a 
flounder (fish) out of water.
You're on a dock, out of the water, only
knowing that you have to slap around trying
to find the water, until you finally find the
edge of the dock and fall in.....

The outcome of this, is that I have been
unable, to figure out what is my next new project.
I have a few to finish, but have been unable
(thanks to the real world), to find the time
to be in the art room....

So as not to make you all suffer from my 
episode of 'Flounder Brain'
I am posting this week a few pictures of
some past projects that I'm in hopes that
you'll find interesting:)
This is one of my collection of metal dress forms.
(With which I'm up to 5 of them, including one
life size model:)
And as you can see from her 'skirt' I had a 
flurry of creative moments making
bottle cap necklaces a while back:)
I do not profess to be into jewelry making,
but I do occasionally make these and a
few other items so I can play with the
vast collection of graphics I've purchased
over the past couple of years.
I'm also, as I make them, picking out
my favourites of each batch to assemble
a bracelet for myself:)
And as you can see, many of the one's I'm
choosing are bird related, (grin).
I figure over time, adding bits and pieces
it'll be a fun piece to wear:)
I encourage all of you to try this medium,
as it's a fun way to create in a mini version
for quick creative time:)
This is also a piece I made out of Tim Holtz
products, and some vintage bits for an
assemblage for myself:)
Also for anyone's interest, this is my latest
purchase to add to my wonderful collection
of dress forms.
I love all the details on this one:)
Although it's a different colour metal
from the rest of my collection
I just couldn't resist getting it as it's
so unique:)
So other than that, just some 'mindless' doodling 
this week....
So I hope you'll excuse my malay at the moment:)

I do want to acknowledge and Thank all
of you New Followers over the past week who
have signed on!
I really appreciate it!
And please feel free to leave me some comments
as I enjoy the interaction and really appreciate
your feedback on my projects!

Cheers!
Enjoy!


Tuesday, July 12, 2011

New 'Story Board' Thanks to Red Lead:)


Hello Everyone:)
Well it's a quiet, windy, rainy evening here in 
Victoria, B.C. Canada.
And I must say from watching CNN
each morning, that my heart goes
out to all of you down South
who are part of the 'Red' States on the
CNN Weather Map in the U.S.!
My goodness, how ever do you cope with
such heat!
I have a couple of air conditioners in storage,
as so far this season, they haven't been needed.
We're kind of thinking that we're going right
into Fall and Winter as it never even seemed
like we had a Spring!
Anyway you all keep safe, and cool!

So tonight, I thought I'd give a 'Shout Out' and
show a little project that I've been working on
in between all the other projects:)


I recently purchased these wonderful stamps
from Chris and Sharon at Red Lead
(their link is in my Favourites Listing:)
I LOVE their line of stamps, and have been
an avid collector for some time now. 
They also have wonderful Customer art swaps,
and although I haven't participated, due to 
mail issues up here in Canada, I've always
enjoyed seeing their Customer's Projects,
(and their own! Brilliant Girls!:)
So I encourage you all to stop by Red Lead
and have a peek:)

So, back to my project:)
I've been studying these two sets of stamps
since they arrived and I had a package
of these cut out chipboards that were
in the Kid's Section at my local 
Michael's Craft Store.
(Always check out the Kid's Section
for art supplies, as you never know 
what might inspire you!)
Now, to look at these wonderful stamps,
and this boring cardboard, (grin)..
who would have thought....
I've tried a few new technique's with this
project, first off, Red Lead's Acetate Sheets
that I've purchased with the 'Negative' Stamp.
Using 'Stazon' Black Ink, as it will not 
smudge, and stay's on, (grin) to the acetate.
I stamped the acetate with the 'Negative' Stamp,
then chose from my huge selection of stamps
anything small and nature inspired.
(And yes, there's that pesky bee again! I just love 
this little stamp from Magenta!)
Whoops, lost a step:)
The background of the cardboard, is computer
paper that I glued to it, that was inked and
I used one of my favourite script stamps along
with Red Lead's 'Honeycomb' Stamp:)
(Now back to my train of thought!)
(grin)

Then I tried a new technique I've just started
playing with using transparency sheets through
my ink jet printer.
I used this lovely graphic from 'Graphics Fairy'
(Thank you very much:)
And printed it on the blank transparency sheet.
I think this little bird is beautiful in it's design.
The original artist really captured all the 
details of this little guy:)
So, keeping in mind he's printed on the transparency sheet...
I then chose a sheet of beautiful scrapbook
paper to put behind the little guy:)

A few little touches here and there...
A tea stained and stamped tag, a wire hanger...
And a finished back side of the 'Story Board'
and again, a new technique for me, printing
paper tissue!
What a fun procedure that has been! You have
to try it!
Take plain artists tissue wrap. It's different from
regular tissue, as it has a side that has a faint
waxy coating.
Take a piece of computer paper, wrap the paper with the
tissue paper and with
scotch tape cover all edges so the paper on the 
back side, so it won't jam in your
printer. (Boy could I tell you stories of my experimenting
with my printer! Or should I say printer's plural!).
Tissue side up, waxy side down:)
Then take all of your paper out of the tray, and place
the sheet face down in the tray, push print with what
ever graphics you are using, and sit back, close your eyes,
and cross your fingers.....(ok, so that part you may not need
to include in the procedure, that's just me:)
Take the printed tissue paper, cut out your design, leaving just
a little edge of the paper around the design, then using 
gel-medium, you can carefully lay your paper on a coat of
gel-medium, then gently apply a coat over the top.
This might take a few tries to get the 'grip of it', as
the paper can tear easily, and depending on the amount of
gel-medium you're using it can be a bit fussy.
But a lot of fun to try!

Cheers for tonight!
Stay cool! Or dry, depending on where you are!

Enjoy!